 Welcome to BCDI’s documentation!


BCDI: tools for pre(post)-processing Bragg and forward coherent X-ray diffraction imaging data
Introduction
BCDI stands for Bragg coherent X-ray diffraction imaging. It can be used for:
pre-processing BCDI and forward CDI data (masking aliens, detector gaps …) before phase retrieval
post-processing after phase retrieval (phase offset and phase ramp removal, averaging, apodization, …)
data analysis on diffraction data (stereographic projection, angular cross-correlation analysis, domain orientation fitting …)
data analysis on phased data (resolution calculation, statistics on the retrieved strain …)
simulation of diffraction intensity (including noise, detector gaps, displacement field …)
creating figures for publication using templates
Considering that most parts of the analysis pipeline are actually beamline-independent, we tried to reuse as much as possible code, and leverage inheritance when it comes to facility or beamline-dependent details.
BCDI as a python toolkit
BCDI can be used as a python library with the following main modules:
bcdi.algorithms: PSF and image deconvolution using Richardson-Lucy algorithmbcdi.experiment: definition of the experimental geometry (beamline, setup, detector, diffractometer…).bcdi.graph: generation of plots using predefined templates.bcdi.postprocessing: methods for post-processing the complex output of a phasing algorithm. Stereographic projection of a diffraction peak or a reconstructed crystal. Automatic detection of reconstructed facets and statistics on facet strain.bcdi.preprocessing: methods for pre-processing the diffraction intensity in Bragg CDI or forward CDI geometry.bcdi.simulation: in BCDI geometry, calculation of the diffraction intensity based on FFT or kinematical sum. It can include a displacement field, noise, detector gaps etc… In forward CDI geometry, calculation of the Bragg peak positions in 3D for a mesocrystal, knowing the unit cell and unit cell parameter.bcdi.utils: generic functions about data loading, fitting functions, cropping/ padding, image registration, validation functions …bcdi.xcca: X-ray cross-correlation analysis related methods
The central module is bcdi.experiment, which contains all setup-related
implementation. This is the place where to look at if you want to add support for a new
beamline or detector.
Acknowledgment and third party packages
We would like to acknowledge the following packages:
xrayutilities: (c) Dominik Kriegner, Eugen Wintersberger. See: J. Appl. Cryst. 46, 1162-1170 (2013).
nxsReady: (c) Andrea Resta @ SOLEIL SIXS
image_registration.py: original code from Xianhui Xiao @ APS Sector 2. See: Opt. Lett. 33, 156-158 (2008).
Some functions were adapted from PyNX: (c) Vincent Favre-Nicolin. See: http://ftp.esrf.fr/pub/scisoft/PyNX/ and J. Appl. Cryst. 49, 1842-1848 (2016).
Anton Mikhailov for the turbo colormap. See https://ai.googleblog.com/2019/08/turbo-improved-rainbow-colormap-for.html
The following third-party packages are required:
numpy, scipy, scikit-image, matplotlib, pyqt5, vtk, h5py, hdf5plugin, fabio, silx, xrayutilities
lmfit: for scripts performing fits
pytest: to run the tests
pytables: to load the devices dictionnary for SIXS data
moviepy, imagemagick or ffmpeg for creating movies
Download & Installation
BCDI is available from:
the Python Package Index:
python -m pip install bcdior on GitHub, where you will find the latest version:
python -m pip install git+https://github.com/carnisj/bcdi.gitpython -m pip install git+https://github.com/carnisj/bcdi.git@branch_nameAdd the flag --upgrade to the commands above in order to update an existing
installation.
Note that there are issues with installing scikit-image within an Anaconda environment. In such situation, the workaround is to create instead a virtual environment using pip.
If you want to contribute to bcdi development, install also extra dependencies:
python -m pip install bcdi[dev]
Please send feedback in GitHub issues.
Documentation
The documentation is available at: https://bcdi.readthedocs.io/en/latest/
Video Documentation
All talks from the bcdiHackweek 2021 are available at the following links:
Carnis, J. - BCDI package overview: https://youtu.be/g4jkzmz8JGk
Li, N. - data preprocessing: https://youtu.be/D-fl19Mi7Ao
Carnis, J. - data preprocessing interactive: https://youtu.be/ddipN43HR1w
Dupraz, M. - data postprocessing + viz: https://youtu.be/WyDzOkJJu8c
Carnis, J. - all that is left in the BCDI package: https://youtu.be/egh8X6iI4Nw
Richard, M.-I. - paraview Facet analyser: https://youtu.be/RarHeUIOu08
Carnis, J. - bcdi Facet analyser: https://youtu.be/gucQk8p3vyk
Simonne, D. - jupyter GUI for bcdi package: https://youtu.be/9SDcGfJqiVw
Related package Cohere:
Harder, R. - Cohere package overview https://youtu.be/I1YOZoxddlE
License
The BCDI library is distributed with a CeCILL-B license (an open-source license similar to the FreeBSD one). See http://cecill.info/licences/Licence_CeCILL-B_V1-en.html
Citation & Bibliography
If you use this package for scientific work, please consider including a citation using the following DOI: 10.5281/zenodo.3257616
This package contributed to the following peer-reviewed publications:
Y. Y. Kim, et al. Single Alloy Nanoparticle X-Ray Imaging during a Catalytic Reaction. Science Advances 7 (2021). DOI: 10.1126/sciadv.abh0757
J. Carnis, et al. Facet-dependent strain determination in electrochemically synthetized platinum model catalytic nanoparticles. Small 2007702 (2021). DOI: 10.1002/smll.202007702 Data available at CXIDB ID182: https://www.cxidb.org/id-182.html
J. Carnis, et al. Twinning/detwinning in an individual platinum nanocrystal during catalytic CO oxidation. Nature Communications 12 (1), 1-10 (2021). DOI: 10.1038/s41467-021-25625-0
J. Carnis, et al. Structural Study of a Self-Assembled Gold Mesocrystal Grain by Coherent X-ray Diffraction Imaging. Nanoscale 13, 10425-10435 (2021). DOI: 10.1039/D1NR01806J Data available at CXIDB ID183: https://www.cxidb.org/id-183.html
N. Li, et al. Mapping Inversion Domain Boundaries Along Single GaN Wires with Bragg Coherent X-ray Imaging. ACS Nano 14, 10305–10312 (2020). DOI: 10.1021/acsnano.0c03775
N. Li, et al. Continu-ous scanning for Bragg coherent X ray imaging. Sci. Rep. 10, 12760 (2020). DOI: 10.1038/s41598-020-69678-5
J. Carnis, et al. Towards a quantitative determination of strain in Bragg Coherent X-ray Diffraction Imaging: artefacts and sign convention in reconstructions. Scientific reports 9, 17357 (2019). DOI: 10.1038/s41598-019-53774-2
W. Hua, et al. Structural insights into the formation and voltage degradation of lithium- and manganese-rich layered oxides. Nat Commun 10, 5365 (2019). DOI: 10.1038/s41467-019-13240-z
G. Niu, et al. Advanced coherent X-ray diffraction and electron microscopy of individual InP nanocrystals on Si nanotips for III-V on Si electronics and optoelectronics. Phys. Rev. Applied 11, 064046 (2019). DOI: 10.1103/PhysRevApplied.11.064046
S. Fernández, et al. In situ structural evolution of single particle model catalysts under ambient pressure reaction conditions. Nanoscale 11, 331-338 (2019). DOI: 10.1039/c8nr08414a
Examples
In this section you will find two examples showing how to pre-process and post-process experimental BCDI data using this package. In order to run the examples, you need first to get the data, which is available at the Coherent X-ray Imaging DataBank. Please download the dataset ID182 from the following website: https://www.cxidb.org/id-182.html
Extract the files, you should get the following:
CXIDB-182/
    Readme ID 182.txt
    CH4760/
        l5.spec
        S11/
        ...
    HS4670/
        ...
For the demonstration, we will use the scan S11 from the experiment CH4760.
The spec file for this scan is l5.spec.
If you installed the package, the scripts and configuration files will be located at the
following location (example with the bcdi package installed in a Python3.8 conda
virtual environment named myenv):
on Windows:
path_to\anaconda3\envs\myenv\Scriptspath_to\anaconda3\envs\myenv\Lib\site-packages\bcdi\exampleson Linux:
/path_to/anaconda3/envs/myenv/bin/path_to/anaconda3/envs/myenv/lib/python3.8/site-packages/bcdi/examplesExample: preprocessing
This example will guide you through the pre-processing of an experimental BCDI dataset measured at the European Synchrotron Radiation Facility, beamline ID01.
The most usefull script is bcdi_preprocessing_BCDI.py. It requires a YAML config
file, which for this example is bcdi/examples/S11_config_preprocessing.yml.
In order to have it running correctly on your machine, you will have to modify the paths for the following parameters:
root_folder: "path_to/CXIDB-I182/CH4760/"
save_dir: "path_to_saving_directory"
data_dir: "path_to/CXIDB-I182/CH4760/S11/"
The script should run properly with other parameters unchanged.
After activating your virtual environment (assuming you created one, which is a good practice), run:
python path_to/bcdi_preprocessing_BCDI.py --conf path_to/S11_config_preprocessing.yml
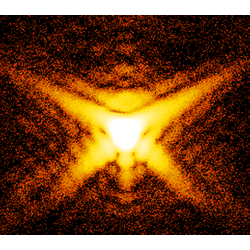
The data will be loaded and a plot is opened. This allows you to check whether, e.g., the region of interest provided is correct. Click on the plot to resume the execution of the script.
After few plots, the window for interactive masking of parasitic intensities appears. You can go through all 2D slices, mask or unmask pixels. A 3D mask is updating in parallel, to be used during phase retrieval.

When you are done, type q when the mouse is over one the plots. The window closes,
and the program execution is resumed. After few other plots, you enter this time in the
interactive window for the projected data. You can use it typically to mask some hot
pixels if they are still present at this stage.
After masking the bad pixels, press again q when the mouse is over one of the plots.
The execution resumes and the final data and mask are saved. The plots of 2D slices
through the data and mask are also shown and saved.
Example: postprocessing
This example will guide you through the post-processing of an experimental BCDI dataset measured at the European Synchrotron Radiation Facility, beamline ID01. Postprocessing occurs after phase retrieval, and typically includes the following steps: interpolation of the object from the detector frame to an orthonormal frame, refraction correction, phase ramp and phase offset removal, displacement and strain calculation etc…
It is assumed that the phase retrieval of this dataset has been realized (e.g. using PyNX), and that the data provided as input is in direct space. If it is still in the detector frame, the first axis is expected to correspond to the rocking dimension, the second axis to the detector vertical axis and the third axis to the detector horizontal axis.
The most usefull script is bcdi_strain.py. It requires a YAML config
file, which for this example is bcdi/examples/S11_config_postprocessing.yml.
A result file named S11_modes_252_420_392_prebinning_1_1_1.h5 is also provided in
bcdi/examples. This is the output of the decomposition into orthogonal modes after
phase retrieval with PyNX. For convenience, copy it to the data folder
“path_to/CXIDB-I182/CH4760/S11/”.
In order to have it running correctly on your machine, you will have to modify the paths for the following parameters:
root_folder: "path_to/CXIDB-I182/CH4760/"
save_dir: "path_to_saving_directory"
data_dir: "path_to/CXIDB-I182/CH4760/S11/"
The script should run properly with other parameters unchanged.
After activating your virtual environment (assuming you created one, which is a good practice), run:
python path_to/bcdi_strain.py --conf path_to/S11_config_postprocessing.yml
After launching the script, a pop-up window opens, allowing you to select the files to
load. By default this window opens at the location defined by data_dir, but you can
navigate to any location on your computer.
The phase retrieval output will be loaded and several postprocessing steps are applied automatically. Below are few important points about parameters:
the interpolation has been extensively tested on several datasets, although we can’t guarantee that the code is 100% bug-free. If the reconstructed crystal after interpolation looks distorted, most probably the parameters original_size, phasing_binning and preprocessing_binning are incorrect.
in case of asymmetric crystal where the orientation is known, and if your crystal looks flipped after interpolation, use the parameter flip_reconstruction to use the complex conjugate instead.
invert_phase should be True for experimental data. This is due to the sign convention of the FFT in Python. For more details, see Scientific reports 9, 17357 (2019) DOI: 10.1038/s41598-019-53774-2
you have the possibility to declare detector angles (corrected for the direct beam position) with the parameters outofplane_angle and inplane_angle. If these parameters are None, the script will try to load them from the log file and will apply the correction if the direct beam position is provided in the config file. The raw data (detector frames) are then expected to be located in
data_dir, and an exception will be raised in the contrary.
Running unit tests
Some of the preprocessing unit tests require to have the example dataset on your local machine. To run them, download the dataset ID182 from the following website: https://www.cxidb.org/id-182.html
Extract the files, you should get the following:
CXIDB-182/
    Readme ID 182.txt
    CH4760/
        l5.spec
        S11/
        ...
    HS4670/
        ...
Unittests use the scan S11 from the experiment CH4760.
The spec file for this scan is l5.spec. You will need to update the paths
root_folder , save_dir and data_dir in the configuration file
bcdi/examples/S11_config_preprocessing.yml.
If the dataset is not available, corresponding unit tests are skipped.
Changelog
Version 0.3.1:
Update dependencies.
Allow the config parameter ‘frames_pattern’ to be a list containing only the indices of the detector frames to skip.
Version 0.3.0:
bcdi_utils.find_bragg: a parameter name in the function signature was change from “roi” to “region_of_interest”, therefore the region of interest was not taken into account anymore when calculating the peak position.
Postprocessing: fix bragg peak calculation for energy scans.
Postprocessing: raise NotImplementedError for energy scans not interpolated during preprocessing.
Version 0.2.9:
Add support for Python3.10 and update dependencies.
Refactor the function bcdi_utils.center_fft in separate classes using inheritance.
Split setup.ortho_directspace into methods to get the transformation matrix in the laboratory frame or crystal frame. Implement setup.ortho_directspace_labframe.
Create a new script postprocessing/bcdi_orthogonalization.py, which only interpolates the output of phase retrieval (no processing on the phase)
Remove temporal couping in the initialization of the Setup instance. Set the paths, create the logfile and read it directly in setup.__init__.
Create classes Analysis, PreprocessingLoader and InteractiveMasker for preprocessing. Refactor preprocessing.process_scan to use these classes.
Add support for ESRF BM02 beamline (th rocking curve).
Create classes Analysis, PhaseManipulator and InterpolatedCrystal for postprocessing. Refactor postprocessing.process_scan to use these classes.
Remove the deprecated parameter ‘fix_size’. THe same functionality can be obtained by using the set of parameters roi_detector, center_roi_x and center_roi_y.
Previously the functionalities regarding Bragg peak finding, rocking curve fitting and plotting were located in tightly binded functions. A class PeakFinder is implemented to gather these functionalities and manage its own state properly.
Add unit tests to postprocessing_utils.find_datarange and make it dimension-agnostic.
Fix a bug with data path formatting in ID01BLISS loader (missing parentheses when creating the data path in the h5 file).
See the full Changelog
Command-line scripts
Some sample scripts are provided with the package. However, the authors make no warranty as to the correctness or accuracy of the analysis provided.
Documentation of the scripts included in BCDI.
API Documentation
Documentation of the modules included in BCDI.